
Wedding photography: Dynamic range and exposure
| If a group of photographers get together and start talking about wedding photography, it’s not usually too long before the subject of exposure and dynamic range comes up.
The issue of correct exposure is probably the biggest and most feared pitfall that can catch out the unprepared, unofficial photographer. The fear stems from the fact that everybody wants a nice photograph of the bride in her beautiful white wedding dress with her new husband, yet standing together they create a high-contrast scene that challenges the dynamic range of most camera sensors and films. Left to their own devices in their all-purpose pattern metering mode, most cameras do a reasonable job, but the results usually have large burned-out patches with absolutely no detail on some (or all) of the bride’s dress. The obvious solution is to reduce the exposure, but the key is to know by how much to avoid the groom’s suit from becoming a uniform mass of black that when brightened is featureless grey. And, of course, the last thing you want is for the bride’s dress to go grey. Fortunately, a little bit of preparation and a thorough understanding of your camera’s sensor or film can banish the problem entirely. The aim is to set an exposure that allows the highlights on the dress to be retained, but that also results in an image that is bright enough to see the buttons on the groom’s jacket and the neatly pressed creases in his trousers. This can usually be achieved by a combination of camera know-how and a little post-capture adjustment. However, while burned-out highlights cannot be recovered, it is usually possible to lift dark shadows a little so they reveal their detail. Minimising the degree of brightening that is required ensures that the final images look natural and do not have excessive levels of noise in their darker areas. Meter from the dressMost camera’s spot meters are calibrated to render their target a midtone, so if you meter from the bride’s dress and use the recommended settings, the fabric will be mid-grey in the image. Fortunately, if you carry out the test in our ‘Know your camera’ secton of this article, you will know by how much your camera can overexpose a midtone before it burns it out. Then, after metering from the dress, it is simply a case of increasing the exposure by the correct value to produce an image that has a white dress with plenty of detail and no burned-out highlights. For example, our tests reveal that at ISO 100, the Nikon D300 can cope with around 2EV of overexposure. So if the spot meter reading from a highlight on the dress indicates an exposure of 1/1000sec at f/5.6, using 1/250sec at f/5.6 will make these areas white, without burning them out. These settings can either be selected in manual-exposure mode, or the camera’s exposure compensation facility can be set to give the required extra exposure in aperture or shutter-priority mode. Once the dynamic range of the camera has been calculated, the trickiest part of this exercise is identifying where to meter from, but this comes with practice. You need to find the brightest area. By keeping an eye on the histogram on the camera’s LCD screen with the highlight warning activated, you can check whether you have got the right spot. A few tiny flecks of burned-out highlight aren’t a problem, but you want to avoid loosing the weave of the dress’s fabric and any beading or intricate stitching. Some might argue that using the histogram view allows the correct exposure settings to be selected without going through the process of calculating the camera’s dynamic range and metering from the dress. It’s a fair point, but it’s a method that requires several experimental images to be taken during the wedding, and it could mean missing that one special shot as, for example, the correct exposure is only set once the confetti has settled and the bride and groom have driven off. |
|
Know your camera
A little bit of experimentation can really pay off when it comes to photographing a wedding. An hour or so spent investigating your digital camera’s metering system, dynamic range and how it deals with highlights, will enable you to set the exposure with confidence.
It’s important to perform this test at all the sensitivity settings you are likely to use because dynamic range can vary across them.
Cameras such as the Nikon D300, for instance, which offer ISO 100 as a low-level expansion setting, usually exhibit a 1EV lower dynamic range at ISO 100 than they do at ISO 200.
This 1EV is lost from the highlights, so they burn out more readily. This suggests that ISO 200 offers the best compromise between high dynamic range and low noise, but in good light outdoors it may mean using a small aperture or a neutral density filter (if you want a wider aperture a blurred background) to keep the shutter speed below the maximum flash synchronisation setting.
Follow this simple procedure with each available sensitivity setting to find out how your DSLR performs:
1. Set your camera to its manual exposure and spot metering modes
2. Position a photographic grey card in good, even light and set the custom white balance so that it is rendered neutral
 3. Photograph the grey card so that it almost fills the image frame and use the exposure settings suggested by the camera’s spot meter to produce a ‘correct’ or ‘normal’ exposure. Aim to use a shutter speed of around 1/60sec
4. Do not change the aperture, but take a sequence of shots gradually decreasing the shutter speed (preferably in 1/3 stops) so each image is brighter than the previous one. Keep shooting until the camera’s highlight warning is flashing across the grey card
5. Next, transfer the images to a computer and open them in Photoshop or similar software. Select the Sampler tool and click on the centre of each image. Use the information palette to read off the brightness value of each shot as you click on it
6. Identify the image taken immediately before the first image to show a brightness value of 255 in any channel and compare its exposure settings with the ‘normal’ exposure image.
The exposure settings are listed in the image EXIF data and are displayed when the image information panel is opened (File>File Info).
Calculate the number of stops between these two images; expect to find a figure of between around two and four stops.
For example, if the normal exposure was taken at 1/60sec and a brightness value of 255 is reached at 1/13sec, the last image with detail will have been taken at 1/15sec. This indicates that the camera has a highlight exposure range of 2EV.
Wedding photography: White balance
When you are spending the day photographing someone wearing a bright white dress it is especially important that the camera’s white balance is set correctly. With this in mind, shoot in raw format, because it gives you the advantage of being able to adjust the white balance easily post-capture.
However, It makes editing the images a lot simpler if you can set the WB as accurately in as possible in-camera.
To do this you need to set the camera’s custom white balance reading. This is best done using a device such as the Seculine ProDisk II.
Alternatively, a white piece of card, or even a grey card, can help set the correct white balance. Make sure you set the custom white balance reading each time the lighting of the scene changes, especially when moving between inside and out.
It may be possible to use the bride’s dress as a white balance target, but before you do sure make sure that the dress is actually white and not a cream or ivory colour.
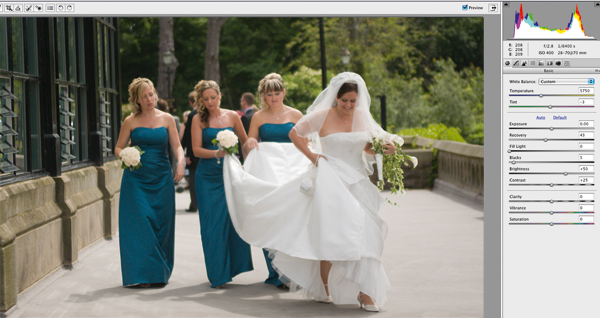
Using Adobe Camera Raw to set white balance
Adobe Camera Raw has a number of WB presets, as well as Auto and Custom settings.

Creating a Custom WB is straightforward. Select the Colour Balance tool at the top of the Camera Raw screen and then move the cursor and click on an area of the image that is meant to be a neutral colour – white, black or grey, for example.
The software automatically adjusts the colour balance across the picture so that this area becomes neutral. It can take a few clicks to find an area that is suitable, and you can always make further tweaks to the white balance by using the Temperature and Tint sliders on the right hand side.
When taking posed shots it is worthwhile asking the subject to hold a white card when taking first image. This can then be used to set the white balance for all the following images in the series, by using the white card as a reference for setting a Custom white balance in Camera Raw.
Wedding photography: Low light and noise
There are times when you have to shoot without flash in low ambient light. On these occasions, it is far easier to get something from your images if you have been shooting them in raw format.
Adobe Camera Raw features a Fill Light option, which lifts the exposure in lower midtone and shadow areas. Other raw conversion software offer a similar tool, which enables you to lighten underexposed areas, as almost if a fill light were used when taking the image.
The only downside is that when you are taking an image in low light a higher ISO sensitivity is required.
Unfortunately, using a higher sensitivity increases the amount of image noise visible in the image. This noise can then be exaggerated by adjusting the exposure levels. However, you can use noise-reduction software to create a smoother image, or you can exaggerate the noise even more to create a high-contrast effect that looks like it was taken on film.
Using Adobe Camera Raw’s Fill tool allows us to lighten the shadows across the bride’s face, although the downside is that the higher ISO speed used to take the image means noise is more prominent after fill light has been adjusted.


