
Wedding photography – Difficult backgrounds
Attention to detail can make a real difference when taking a wedding photograph. We’ve all taken snapshot portraits where a person has a telegraph pole or a small tree sprouting out of their head. Make this mistake when taking wedding photographs and it can be a disaster.
The problem can be easily avoided by having a good look at the scene before you take a photograph. Check the background to an image for telegraph poles, power lines and for even smaller details like signposts or litter. When taking images inside, fire exit signs are a common problem, as are fire extinguishers.
 Image: Changing the angle that this image was taken at would have meant the bride wouldn’t look like she was wearing a jetpack on her back
 If you have no choice but to include some unwanted elements when taking the images, then there are still ways that you can reduce their impact in the background. The most obvious is to use a wide aperture. A lens with an aperture of f/2.8 allows you to create a sufficiently shallow depth of field that backgrounds become blurred enough not to be distracting
Larger objects can be difficult to remove in editing software, so try shooting from angles that keep offending backgrounds out of shots.
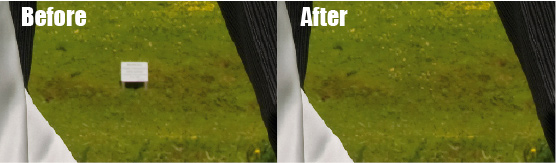
It is much easier to use editing software to clone smaller items, such as litter, out of an image.
You should check every image before you give them to the bride and groom, making sure that all distracting objects have been removed.
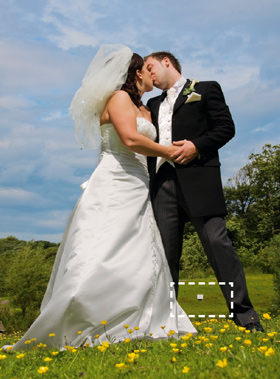
Image: Look out for small details such as litter, or in this case a sign
Wedding photography: Removing red eye
When shooting indoors with flash redeye can be an issue. It occurs in dark environments, when the pupil of a subject’s eye opens wide to let in more light. When a flash fires, it lights up the blood vessels in the back of the eye, which become visible as the pupil is wide open.
The effect is more prominent the closer the flash is to the camera lens, which is why it is often a common occurrence when using compact cameras.
Anti-redeye flash is probably the most common solution. It works by firing a pre-flash, which causes the pupil to reduce in size, helping to reduce redeye when the actual flash fires and the exposure takes place.
However, anti-redeye flash may not be suitable for documentary style images, as it delays the moment that the exposure is taken.
Instead, another solution is to try and place the flash further from the camera lens. Many wedding photographers do this by using an off-camera flash bracket, such as those produced by Custom Brackets (see www.flaghead.co.uk for more details).
Alternatively, use a flashgun and point the flash up at the ceiling to bounce the flash down towards the subject.
 If you find you have a great image, but the subject has redeye, then it can be easily removed in Adobe Photoshop Elements or similar software.
In fact, Adobe Photoshop Elements 7 can automatically look for redeye in images and correct it when the picture is imported.
If you wish to manually select redeye, just use the Red Eye tool to select the red pupil in the image and Elements will then automatically reduce the amount of red in this area.

Images: Most image editing software makes it very simple to reduce redeye
Wedding photography: Blinking
One of the certainties of wedding photography is that at some point someone will blink while being photographed. To make matters worse, the more people you photograph, the more likely it is to happen.
Once again, a rescue job can be performed usung image-editing software, but to do so you need to take a few images of each group scene. The aim is that if someone does blink in one of the images, they will hopefully have their eyes open in another shot. All you have to do is copy the eyes from one image and clone them over the eyes in the image in which they are shut.
If you are taking a group shot of all of the guests you can even try asking everyone to shut their eyes and open them on the count of three. This normally seems so preposterous that most of the guests will also have a smile on their face when they do open their eyes.

Cloning eyes
 Step 1. Open your two images in Adobe Photoshop and select Window>Arrange>Tile Horizontally and then Window>Arrange>Match Zoom and Location. This will align the images that you wish to edit. Zoom in on the eyes that you are going to replace
 Step 2. In the image with the open eyes, select the Clone tool. Now hold down Alt and click on the corner of the open eye
 Step 3. In the image where the eyes are closed, click on the same corner. The Clone tool will clone the eyes from one image to the next. To create a smooth transition when cloning, set the Opacity of the Clone tool to around 20% and use it around the edges of the eyes. Repeat this for each eye and, if necessary, to add a smile.


